Monday 27 April 2020

Xamarin.Forms 4.0 CollectionView_Experimental

As part of the upcoming Xamarin.Forms 4.0 release, we are implementing the all new CollectionView control. The CollectionView is intended to be a successor to the ListView, improving upon its design by reducing technical complexity and allowing for more flexibility of layout and function. But we’re not stopping there! Along with this also comes the long-awaited CarouselView.
Technical note: Enable the CollectionView (which also enables the CarouselView) with a feature flag just before you initialize Xamarin.Forms in your MainActivity.cs and AppDelegate:
global::Xamarin.Forms.Forms.SetFlags("CollectionView_Experimental");
Follow along: if you wish to follow along with this blog post you can clone and run the sample from GitHub. Alternatively, if you want to update an existing project to the Xamarin.Forms 4.0-pre NuGet (available via your favorite NuGet package manager using the pre-release option).

A Basic Layout

One of the biggest changes between ListView and CollectionView is the removal of wrapping content in a ViewCell. This allows for significant gains to performance, especially on Android, while remaining familiar to what you’ve done before when using the ListView.
Below is an example layout. For simplicity’s sake, create a List<string> of people’s names in your binding context and then bind to it in XAML:
<StackLayout>
    <CollectionView x:Name="CV" 
                    ItemsSource="{Binding People}" 
                    Margin="10,0,0,0">
        <CollectionView.ItemTemplate>
            <DataTemplate>
                <StackLayout HeightRequest="50" WidthRequest="200" Orientation="Horizontal" Padding="0,5,0,5">
                    <Image Source="person"/>
                    <Label Text="{Binding}" VerticalOptions="Center"/>
                </StackLayout>
            </DataTemplate>
        </CollectionView.ItemTemplate>
    </CollectionView>
</StackLayout>

A Basic CollectionView
Add caption
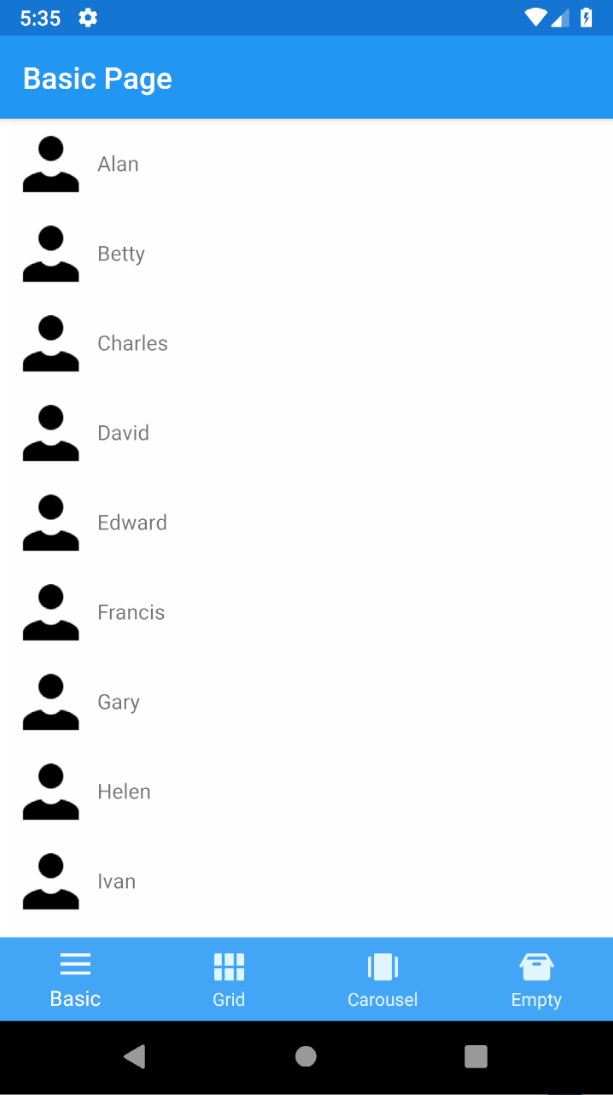
You now have a basic list of items. Notice that you no longer use a ViewCell, but a DataTemplate! Hopefully, so far this new CollectionView is familiar to the ListView you’ve used in the past. Let’s look now at what else it can do.

Making A Grid Layout

By default, CollectionView assumes a linear layout. That means you can not only do vertical lists, but horizontal as well! This is accomplished by setting the ItemsLayout property to a new instance of ListItemsLayout which takes an ItemsLayoutOrientation parameter (Vertical|Horizontal).
There’s also another option available: the GridItemsLayout.
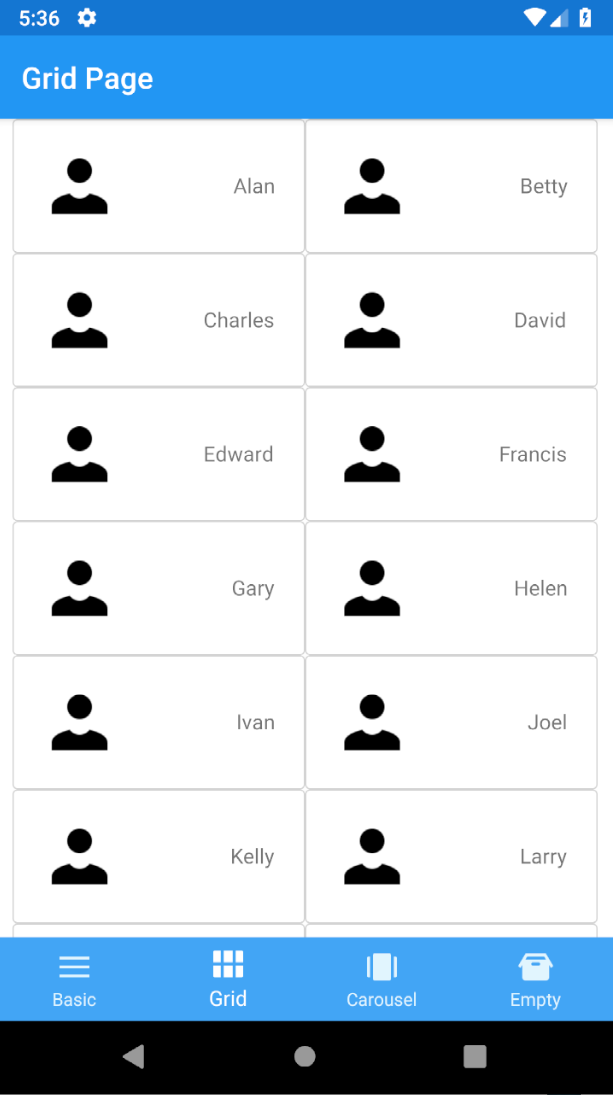
Going back to the previous example above, you can use this option to make the CollectionView look a little fancier. Using a GridItemsLayout, you still get a scrollable list, but now with two items in each row:
  <StackLayout>
      <CollectionView x:Name="CV" ItemsSource="{Binding People}" VerticalOptions="Center" HorizontalOptions="Center" Margin="10,0,10,0">
          <CollectionView.ItemsLayout>
              <GridItemsLayout Orientation="Horizontal" Span="2"/>
          </CollectionView.ItemsLayout>
          <CollectionView.ItemTemplate>
              <DataTemplate>
                  <Frame BorderColor="LightGray" CornerRadius="3" HasShadow="False">
                      <Grid>
                          <Grid.ColumnDefinitions>
                              <ColumnDefinition Width="Auto"/>
                              <ColumnDefinition Width="100" />
                          </Grid.ColumnDefinitions>
                          <Grid.RowDefinitions>
                              <RowDefinition Height="Auto"/>
                          </Grid.RowDefinitions>
                          <Image Grid.Column="0" Source="person" Aspect="Fill"/>
                          <StackLayout Grid.Column="1">
                              <Label Text="{Binding}" HorizontalOptions="EndAndExpand" VerticalOptions="CenterAndExpand"/>
                          </StackLayout>
                      </Grid>
                  </Frame>
              </DataTemplate>
          </CollectionView.ItemTemplate>
      </CollectionView>
  </StackLayout>
Note the ItemsLayout in the above XAML. Setting the Orientation to Vertical indicates the direction in which the CollectionView expands, and the Span property sets the number of items per row. In this instance, when you choose to display two you get this result:
A Grid-style CollectionView

CarouselView is Here

The previous example shows a scrollable grid of people, but perhaps you want to show one person at a time in a card format. You can use CarouselView, a separate control which uses CollectionView as its basis, can be used to adjust your layout, and add in some business card-like information:
<CarouselView   x:Name="CV" 
                ItemsSource="{Binding People}" 
                HeightRequest="200" 
                HorizontalOptions="Center" 
                VerticalOptions="CenterAndExpand" 
                Margin="10">
    <CarouselView.ItemsLayout>
        <GridItemsLayout Orientation="Horizontal"/>
    </CarouselView.ItemsLayout>
    <CarouselView.ItemTemplate>
        <DataTemplate>
            <Frame BorderColor="LightGray" CornerRadius="3" HasShadow="False">
                <Grid>
                    <Grid.ColumnDefinitions>
                        <ColumnDefinition Width="75"/>
                        <ColumnDefinition Width="*" />
                    </Grid.ColumnDefinitions>
                    <Grid.RowDefinitions>
                        <RowDefinition Height="*"/>
                        <RowDefinition Height="*"/>
                    </Grid.RowDefinitions>
                    <Image Grid.Column="0" Grid.Row="0" Source="person" VerticalOptions="Start"/>
                    <StackLayout Grid.Column="1" Grid.Row="1" HorizontalOptions="EndAndExpand" VerticalOptions="EndAndExpand">
                        <Label Text="{Binding}" FontSize="24" HorizontalOptions="EndAndExpand"/>
                        <Label Text="Company Address" HorizontalOptions="EndAndExpand"/>
                        <Label Text="City, State" HorizontalOptions="EndAndExpand"/>
                    </StackLayout>
                </Grid>
            </Frame>
        </DataTemplate>
    </CarouselView.ItemTemplate>
</CarouselView>

A page using a CarouselView

It’s a Snap to Use

One of the great features provided by CollectionView is the ability to add snap points. For the page you just designed, it allows for the view to stop part-way between cards. What if you instead want only one card to appear centered at a time? With the SnapPointsAlignment and SnapPointsType properties on the ItemsLayout, you can configure this behavior in a snap (pun intended)! Add the following to your XAML for enabling this behavior:
<CarouselView.ItemsLayout>
    <GridItemsLayout 
        Orientation="Horizontal" 
        SnapPointsAlignment="Center" 
        SnapPointsType="Mandatory"/>
</CarouselView.ItemsLayout>

A CarouselView using a SnapPoint

It’s so Empty in Here

Lastly, a common scenario many developers may face is what to display when the ItemsSource is empty. With the CollectionView you can now set any content to the EmptyView  of your list for just this purpose. With the XAML below, the string “No items currently exist!” will be shown inside of the CollectionView when the list of people is empty:
<CollectionView.EmptyView>
    <Label Text="No items currently exist!"/>
</CollectionView.EmptyView>

An EmptyView

You can customize this view however you like, including interactive content and supporting bindings.

Utilizing the iOS Background with Xamarin

The Background Transfer Service in iOS is a service that allows your app to download or upload large amounts of data in the background with no time limits. Whether your app is in the foreground, suspended, or sitting in the background, it can download as much data as it wants without the time limits that iOS enforces with other mechanisms.

When using the Background Transfer Service, you are essentially allowing iOS to take control of your download. Depending on external factors, such as available resources, interruptions, network connectivity, battery life, etc., iOS will decide when to give your application time to process network content. While the download/upload is in progress, iOS will periodically ping your application to inform current status or errors. 

By relinquishing control of the network transfer to the operation system, you lose some predictability and speed, but you gain a lot of extra flexibility and power with regard to your web traffic.

The backbone of the Background Transfer Service is implemented using the NSUrlSession API. To use this API, you must create a download/upload session along with a set of background tasks (or just a single task) to actually do the work. These tasks are instances of NSURLSessionTask objects. The session also requires a delegate—an instance of NSUrlSessionTaskDelegate, which is how iOS communicates with your application.

The Basics of Background Transfer Service

Let’s update the example from my previous post, using the Background Transfer Service, rather than HttpClient, to fetch the image.

1. Create the background session object.

In order to use the NSUrlSession API, we need to first create and configure an NSUrlSession object. As you can see below in the ConfigureBackgroundSession method, we use BackgroundSessionConfiguration to check if there is an already-configured session. If so, we can just use that. Otherwise, we create a new background session configuration with CreateBackgroundSessionConfiguration and pass in a session ID, which is just a unique string. If you try to create a session with a session identifier that already exists, iOS will not create a new session configuration.
Once we have our NSUrlSessionConfiguration, we can use this configuration to create the session object. Creating the session is quite simple—just use the NSUrlSession.FromConfiguration static method. This method requires the instance of your configuration object as well as a delegate, which will be used as the interface between iOS and your application. This UrlSessionDelegate will be defined later.
C#
public partial class AppDelegate
{
  const string SessionId = "com.example.backgroundSession";

  private NSUrlSession ConfigureBackgroundSession()
  {
    var configuration = NSUrlSessionConfiguration.BackgroundSessionConfiguration(SessionId);
    if (configuration == null) {
      configuration = NSUrlSessionConfiguration.CreateBackgroundSessionConfiguration (SessionId);
    }

    using (configuration) {
      return NSUrlSession.FromConfiguration (configuration, new UrlSessionDelegate(), null);
    }
  }
}

2. Kick off the download task(s).

Once you have the session configured, the next step is to kick off some download tasks. In our case, we only need one task, but if we were to be downloading multiple files, it would be best to utilize multiple download tasks. This FetchImage is the same method used in my previous post, but I have removed the call to HttpClient. Instead, we are creating the NSUrlSession and initializing a download task.
The CreateDownloadTask method is used to create a download task on a background session. It is important that you call Resume on the task to start the asynchronous download. You can also cancel and resume the download at any point.
C#
public UIBackgroundFetchResult FetchImage (string url)
{
  var session = ConfigureBackgroundSession();

  var request = new NSMutableUrlRequest(NSURL.FromString(url));
  request.HttpMethod = "GET";
  using (request) {
    var task = session.CreateDownloadTask(request);
    task.Resume();
  }

  return UIBackgroundFetchResult.NewData;
}

3. Create the NSUrlSessionDelegate.

Now that we have the session configured and the download tasks running, we need to implement the NSUrlSessionDelegate class to allow iOS to communicate status back to our app and for our app to inform iOS when it is all done. Since we are using an NSUrlSessionDownloadTask, we will implement an NSUrlSessionDownloadDelegate delegate.
Below is a basic implementation of a UrlSessionDelegate. In the constructor, we just set the file path where we want the image stored. This is the same location as in the earlier example. Then, we implement the DidWriteDataDidFinishDownloading and DidFinishEventsForBackgroundSession delegate methods. Depending on the needs of the application, there are several other optional methods that could be implemented.
C#
public class UrlSessionDelegate : NSUrlSessionDownloadDelegate
{
  private string destinationFilepath;
  
  public UrlSessionDelegate()
  {
    destinationFilepath = Path.Combine(Environment.GetFolderPath(Environment.SpecialFolder.Personal), "xamarin.png");
  }

  public override void DidWriteData (NSUrlSession session, NSUrlSessionDownloadTask task, long bytesWritten, long totalBytesWritten, long totalBytesExpectedToWrite)
  {
    float progress = totalBytesWritten / (float)totalBytesExpectedToWrite;
    Console.WriteLine ($"Task: {task.TaskIdentifier}  progress: {progress}");
    // perform any UI updates here
  }

  public override void DidFinishDownloading (NSUrlSession session, NSUrlSessionDownloadTask task, NSUrl location)
  {
    Console.WriteLine($"Download task {task.TaskIdentifier} completed!");
    // Copy the file to a permanent location
    if (File.Exists(destinationUrl)) {
      File.Delete(destinationUrl);
    }
    File.Copy (location.Path, destinationUrl);
  }

  public override void DidFinishEventsForBackgroundSession (NSUrlSession session)
  {
    // Perform any processing on the data

    using (var appDelegate = UIApplication.SharedApplication.Delegate as AppDelegate) {
      var handler = appDelegate.BackgroundUrlCompletionHandler;
      if (handler != null) {
        handler.Invoke();
      }
    }
  }
}
The DidWriteData method is called periodically throughout the download process. It reports the number of bytes written in this chunk, the total number written by this task, and the total expected bytes to be received. This is a really useful method for reporting download progress. We are just calculating the progress and printing the percentage to the console.
The DidFinishDownloading method is called once the task has finished downloading all data. The task will write its data to a temporary file in the file system. It is up to you to copy that file to a more permanent location, if required. Once control leaves this method, the temporary file will be deleted. If you have multiple download tasks running concurrently, be sure to check that the task is the expected task before processing the data.
The DidFinishEventsForBackgroundSession method is a very important one, and it is the final step in a Background Transfer. This is where you can perform any last-minute processing or UI updates before iOS puts you in the background (assuming your app is in the background when this runs). Once you have performed all necessary processing of the downloaded content, you must call the completion handler. Which brings us to…

4. Hook into the AppDelegate.

Before iOS actually starts downloading your content, it will call the HandleEventsForBackgroundUrl delegate method and pass in a completion handler.
C#
public Action BackgroundUrlCompletionHandler { get; private set; }

public override void HandleEventsForBackgroundUrl (UIApplication application, string sessionIdentifier, Action completionHandler)
{
  BackgroundUrlCompletionHandler = completionHandler;
}
This completion handler is not to be confused with the completion handler passed into the PerformFetch delegate method. This completion handler is used to tell iOS when the background transfer is complete, and you are ready to go back to the background. All we need to do in the HandleEventsForBackgroundUrl method is save off the completion handler. It must be called from DidFinishEventsForBackgroundSession (see above).

Looking Down the Road with Xamarin

The Background Transfer Service is a powerful feature of iOS which, if used correctly, can greatly enhance the user experience of your application. It allows developers to be flexible with our timing requirements and lets large and unpredictably sized downloads or uploads happen in the background.
This was a very basic example to demonstrate and explain the iOS Background Transfer Service, especially as it relates to Xamarin’s implementation. In my experience with Xamarin so far, it has proven a very painless exercise to implement background services, and I am excited to see what the future has in store for Xamarin.

All About .NET MAUI

  What’s .NET MAUI? .NET MAUI (.NET Multi-platform App UI) is a framework for building modern, multi-platform, natively compiled iOS, Androi...

Ads2