Steps to create a demo to scan barcode code 128.
Open a new shared Xamarin App. First update Xamarin Forms NuGet package form “Manage NuGet Packages For Solution”.


For using Zxing in Xamarin Forms we have to first add NuGet to both the projects, which are Android and iOS.

After adding NuGet to our project in the Android project open “MainActivity.cs” and add the below code to the class.

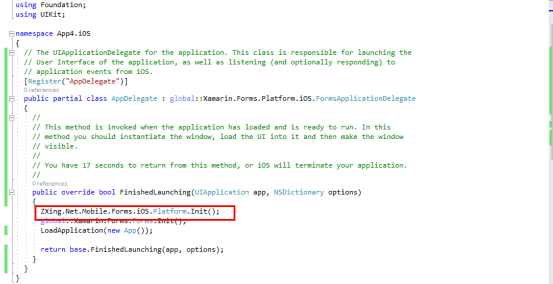
For iOS projects open AppDelegate.cs and add the below code to the class.

Now we can use ZXing in our project.
Add a new content page (C#). We can create the UI in C#.
For this go to the solution and right click and go to the new items.

Choose Content Page(C#) and give the name to the page by entering it in the text box and clicking Add button.

Add Zxing.Net.Mobile.Forms namespace into the project page. And write the following code into your page.


After
adding this code in your page go your AndroidManifest.xml file from
properties in your Android project. And add both permissions (CAMERA and
FLASHLIGHT).

After adding this permission run your project . Now, your app is ready for a scan bar code.


Open a new shared Xamarin App. First update Xamarin Forms NuGet package form “Manage NuGet Packages For Solution”.


Add a new content page (C#). We can create the UI in C#.
For this go to the solution and right click and go to the new items.


- publicclassscanBarCode: ContentPage {
- StackLayout stkMainlayout;
- public scanBarCode() {
- stkMainlayout = new StackLayout {
- HorizontalOptions = LayoutOptions.FillAndExpand,
- VerticalOptions = LayoutOptions.FillAndExpand,
- Orientation = StackOrientation.Vertical
- };
- ZXingScannerPage scanPage;
- Button btnScan = new Button {
- Text = "Scan", HorizontalOptions = LayoutOptions.Center, VerticalOptions = LayoutOptions.Center
- };
- btnScan.Clicked += async (a, s) => {
- scanPage = new ZXingScannerPage();
- scanPage.OnScanResult += (result) => {
- scanPage.IsScanning = false;
- Device.BeginInvokeOnMainThread(async () => {
- await Navigation.PopModalAsync();
- await DisplayAlert("Scanned Barcode", result.Text + " , " + result.BarcodeFormat + " ," + result.ResultPoints[0].ToString(), "OK");
- });
- };
- await Navigation.PushModalAsync(scanPage);
- };
- stkMainlayout.Children.Add(btnScan);
- Content = stkMainlayout;
- }
- }
- }

- <uses-permissionandroid:name="android.permission.CAMERA" />
- <uses-permissionandroid:name="android.permission.FLASHLIGHT" />


Now your app is ready for work.


Much obliged for giving us such astonishing data on the scanner. I am a businessman and I was looking for this kind of data to shape my improvement. Thank you so much. Get lidar Vancouver, BC
ReplyDeleteThis is a brilliant blog! I'm very happy with the comments!.. photo scanner reviews
ReplyDeleteNice coding techniques. It is a great way to explain. Keep sharing more articles soon. Now it's time to avail Chukka Boots for more information.
ReplyDelete